Introduction to Image Search Techniques
I tested 12 image search tools for a year. Here's which image search techniques actually work in 2026, and which are hype.

toc Table of Contents Click to expand (74 sections) expand_more
I spent the better part of last year running the same 40 images through every image search tool I could get an account for. Same photos. Same order. A cropped product shot, a screenshot of a viral tweet image, a friend’s LinkedIn headshot (with permission), a blurry photo of a plant in my mother’s garden, and a stock photo I’d licensed and later found on three websites that hadn’t paid for it.
Four tools were genuinely useful. The rest either returned the same image back to me and called it a day, or confidently matched a red handbag to a fire extinguisher.
This piece is what I learned. Not a tour of documentation, just the actual image search techniques that work, the ones that don’t, and how to pick between them depending on whether you’re verifying a photo, hunting down stolen work, or building visual search into a product. If you’ve ever uploaded an image, gotten 200 results, and had no idea which one was the original, that’s the exact problem I’m solving here.
How Image Search Works
Here’s the mental model that finally made this click for me: image search doesn’t search images. It searches numbers that describe images.
When you upload a photo, nothing is comparing your picture to billions of pictures pixel by pixel. That would take hours. Instead, your image gets converted into a compact numerical fingerprint, usually a few hundred to a few thousand numbers, and the engine looks for other fingerprints that sit close to yours in mathematical space. The whole thing is a nearest-neighbour lookup wearing a trench coat.
Once I understood that, a lot of weird behaviour stopped being weird. Why does a search sometimes return a different photograph of the same handbag instead of the exact one? Because the fingerprint captures shape, colour and texture, not identity. Why does a heavily recoloured image still get found? Because most of the fingerprint survives a colour shift.
From Pixels to Patterns: AI and Computer Vision
A digital image, to a machine, is a matrix of pixel values. Nothing more. Computer vision is the work of turning that matrix into something with meaning: edges first, then textures and shapes, then objects, then scenes and relationships between objects.

Modern systems do this with deep learning. A neural network is trained on millions of labelled images until it learns, layer by layer, what “edge” means, then “fur texture,” then “cat.” The early layers of these networks are honestly boring; they detect lines and gradients. The interesting stuff happens deeper, where the model starts responding to whole concepts.
The practical takeaway for anyone using these tools: the model sees what it was trained to see. Ask Google Lens to identify a common houseplant and it nails it. Ask it to identify a specialised industrial part and it’ll guess “metal object.” Training data is the ceiling.
Image Algorithms: SIFT, SURF, and CNNs
Three names come up constantly, and they represent two completely different eras.

SIFT (Scale-Invariant Feature Transform) and SURF (Speeded-Up Robust Features) are the classic approach. They find keypoints: corners, distinctive patterns, high-contrast junctions. Each keypoint gets described with a vector (128 dimensions for SIFT, a more compact 64 for SURF). The magic is that these descriptors survive rotation, scaling and moderate lighting changes. Rotate a photo 90 degrees and SIFT still matches it.
CNNs (Convolutional Neural Networks) came later and changed the economics. Architectures like ResNet and VGG learn their own features instead of using hand-designed ones. They’re slower to train and far better at anything semantic, telling you “this is a wedding” rather than “these two images share 47 keypoints.”
My honest take: don’t treat this as old versus new. I still reach for SIFT-style matching when I need to prove two images are the same image (forensics, duplicate detection), because it’s fast, explainable, and doesn’t hallucinate similarity. I reach for CNN embeddings when I need “find me things like this.” Different jobs.
Content-Based Image Retrieval (CBIR)
CBIR is the umbrella term for searching images by their actual visual content rather than by the text around them. Colour histograms, texture patterns, shape features, spatial relationships between regions, all analysed directly from the pixels.
This matters most where text descriptions are useless or don’t exist. A radiologist comparing a lung scan against a medical imaging database of similar cases doesn’t have keywords to type. Neither does a satellite analyst looking for changes over time, or an enterprise digital asset management system sitting on 400,000 untagged brand assets.
CBIR is also where most in-house projects go wrong. Teams underestimate how much retrieval accuracy depends on the quality and domain-fit of the training data. A general-purpose model dropped onto medical or industrial imagery performs badly, and no amount of index tuning fixes it.
Vector Embeddings and Cosine Similarity
This is the part I wish someone had explained to me on day one.

An embedding is that numerical fingerprint, typically a vector of 512 to 2,048 numbers representing the image’s meaning rather than its pixels. Two images of the same couch photographed in different rooms produce vectors that sit close together. A couch and a coffee mug produce vectors that don’t.
“Close together” is measured with cosine similarity, the angle between two vectors, ignoring their magnitude. Ignoring magnitude is the whole trick. It’s why a dark, underexposed photo of your sofa still matches a brightly lit one: the direction of the vector holds, even when the intensity doesn’t.
If you’re building anything in this space, this is where you start. I’ve written more about the stack we use for this on the SoftbrixAI site, and the technologies we build these systems with page covers the tooling in more depth. For testing vector pipelines and QA best practices, review our guide on Software Testing Basics. For evaluating API search vendors, latency benchmarks, and extraction tools, explore our comprehensive breakdown on the Best API Search Company’s Homepage in 2026. For evaluating text-to-image generation tools, GANs vs. diffusion models, and verified alternatives, read our in-depth review of Gramhir.pro AI Image Generator. For low-latency vector retrieval architectures, check our technical guide on Sub-250ms Inference Latency Budget and How to Evaluate an LLM Application. Emerging quantum algorithms are also pushing high-dimensional vector search boundaries; read our analysis on the Latest Breakthroughs in Quantum Computing.
Feature Detection (Classic Algorithms)
Classic feature detection is deterministic, cheap and explainable. You get keypoints and descriptors, you match them, you count the matches. If 200 keypoints line up geometrically, it’s the same image, and you can show someone why.
Where it shines: exact-match detection, image stitching, forensic verification, matching a photo against a known reference. Where it falls apart: anything requiring understanding. SIFT has no idea what a dog is. It only knows that these corners look like those corners.
One workaround the docs never mention: if you’re matching against compressed thumbnails or heavily resized copies, run your keypoint detection on a normalised resolution for both images. I lost the better part of two days to matches that failed purely because one image was 4000px and the other was 400px.
Deep Learning Models (Modern Approach)
CNNs dominated from roughly 2012 onward. Vision Transformers (ViTs) are what a lot of newer systems run on. They chop an image into a sequence of patches and apply transformer architecture, the same family of models behind large language models.
The practical difference I’ve noticed: ViTs handle context better. Give a CNN a photo of a person holding a tennis racket on a beach and it tags “person, racket, sand.” Give it to a modern multimodal model and you get “someone playing beach tennis at sunset.” That’s a different class of answer, and it’s why 2026’s tools feel qualitatively different from 2021’s.
Frameworks matter less than people think, but if you’re picking one, most of our production vision work runs on TensorFlow with Python around it for the pipeline glue. For high-throughput model serving benchmarks, read our breakdown of vLLM vs TGI vs Triton LLM Serving and our guide on GPU Cost Optimization on Kubernetes.
Image Indexing & Matching
Every image in the index is pre-processed once: run through the model, converted to an embedding, stored in a vector database. That’s the expensive part, and it happens long before you ever search.
At query time, your uploaded image gets the same treatment, and then an approximate nearest neighbour (ANN) algorithm finds the closest vectors. “Approximate” is doing real work in that sentence, because exact nearest-neighbour search across billions of vectors is computationally brutal, so these systems trade a sliver of accuracy for enormous speed gains. In practice you’d never notice the difference.
The top matches then get re-ranked using signals the embedding doesn’t capture: image metadata, page authority, freshness, your location and search history.
Step-by-Step Process: Image Input, Processing, Feature Extraction, Matching, Context & Metadata Analysis, Ranking & Display
Here’s the full pipeline in order, which is what most explanations skip:
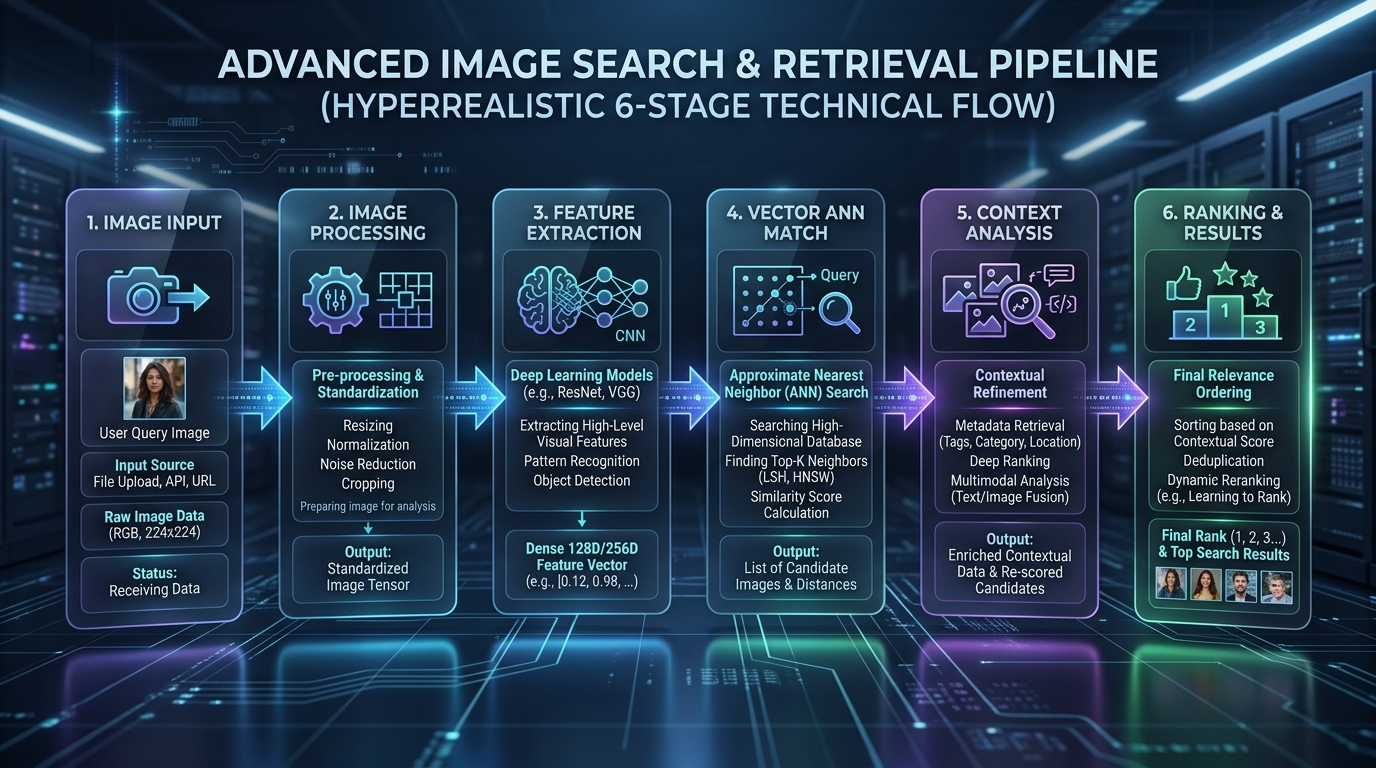
| Stage | What actually happens |
|---|---|
| 1. Image input | You upload a file, paste a URL, or point a camera. The system accepts and validates the file. |
| 2. Processing | Resize to a standard resolution, normalise the colour profile, correct orientation. Boring, but errors here poison everything downstream. |
| 3. Feature extraction | Low-level features (edges, colours, textures), mid-level (shapes, regions), high-level (recognisable objects). Output: an embedding. |
| 4. Matching | ANN search against pre-computed embeddings in the vector database. Returns candidate matches with similarity scores. |
| 5. Context & metadata analysis | Alt text, captions, file names, surrounding page text, EXIF data. This is why image SEO still matters in an AI-first world. |
| 6. Ranking & display | Candidates re-scored on relevance, authority, freshness and user context, then rendered. |
Stage 5 is the one people forget. Visual matching narrows the field; text and metadata decide the order. I’ve seen a technically weaker match outrank a stronger one purely because it sat on a page with a descriptive caption.
Key Image Recognition Capabilities
Object Recognition
Object detection finds and labels things in an image: animals, vehicles, household items, logos, food, plants. Modern systems don’t just classify the whole image; they localise, drawing boxes around each object so you can search a single item inside a busy lifestyle photograph.
That localisation is the feature I use most. In a photo of a full living room, I can isolate one lamp and search only for it. Before object localisation, that search returned “living rooms.”
Accuracy is very uneven by category. In my testing, common consumer products, plants and landmarks were reliably identified. Specialised tools, obscure machine parts and anything handwritten were hit-or-miss at best.
Facial Recognition
Face search is the most powerful and most fraught capability here. Systems detect faces, extract a facial embedding, and match against indexed faces. Yandex and lenso.ai are noticeably stronger at this than Google, which deliberately restricts face matching.
Legitimate uses are real: verifying that a dating profile photo isn’t stolen, identifying whether your own photo is being used fraudulently, journalists confirming a source’s identity, law enforcement working an active case.
But be honest about the limits. Accuracy degrades badly on non-Western datasets, a well-documented bias in training data, not a bug you can configure away. And face search raises genuine privacy questions plus real regulatory exposure in several US states. My rule: I use it on my own images, or on images where I’m the person with a legitimate interest. Not on strangers.
Top Image Search Tools
Google Images and Google Lens
Google Lens is the default answer for most people, and it deserves to be. The index is the largest, the object recognition is excellent, and multisearch, where you upload an image and add text like “in blue” or “under $80,” is the single most useful feature in any of these tools.
What I use it for constantly: identifying plants and landmarks, translating signs from photos, and shopping. Snap a photo of shoes and you get the product, pricing and alternatives. On desktop, right-click any image and hit “Search with Google Lens.” On mobile, long-press an image or use the camera icon.
Where it disappoints: it’s bad at finding where else on the web an exact image appears, because it prioritises visual similarity and commerce over exact-match provenance. For that, you want TinEye.
TinEye for Exact Match Detection
TinEye was the original reverse image search engine and it’s still the best at the one thing it does: finding exact copies and edited versions of a specific image. It’ll surface crops, resizes, recolours and higher-resolution originals, sorted by oldest first, which is exactly what you need to find the original creator.
The “sort by oldest” option is the feature I’d pay for on its own. When a viral image is circulating and everyone’s claiming credit, sorting chronologically usually ends the argument in about ten seconds.
Its index is smaller than Google’s and it makes no attempt at semantic similarity. That’s a feature, not a bug. Browser extensions for Chrome, Firefox, Edge and Opera make it a one-right-click operation.
Yandex Images for Face Recognition
Uncomfortable truth: Yandex is the best free face-matching tool available to the public, and it isn’t close. Its recognition algorithms match face patterns and distinctive marks well enough to find people from cropped, low-quality photos where Google returns nothing.
It’s also strongest on Eastern European and Russian sources, which is either exactly what you need or completely irrelevant depending on your case. For US-focused work, its coverage of American sites is thinner than Google’s.
Investigators and journalists use it heavily for cross-referencing. If you’re doing verification work, it belongs in your toolkit even if it isn’t your first stop.
Pinterest Lens for Creative Discovery
Pinterest Lens isn’t for verification at all. It’s for inspiration, and it’s the best tool in that lane. Point it at an outfit or a room and you get visually similar ideas plus shoppable products.
I use it when I need alternatives rather than the exact item. Home decor, recipes from a photo of a finished dish, streetstyle. Interior designers and fashion buyers I know live in this tool. Everyone else forgets it exists.
Lenso AI for Advanced Recognition
Lenso.ai is a newer AI-driven platform built specifically around face search, place search and similar-image discovery, with an alerts feature that emails you when a monitored image shows up somewhere new. That alerting is the reason to consider it, because nothing else on this list monitors continuously without a paid enterprise plan.
Smaller index than the giants, so it misses things. But for brand protection, catfish detection and stolen content monitoring, the alert system does work that manual searching can’t.
Shutterstock for Image Tracking and Copyright Protection
Shutterstock’s reverse image search does something different: it searches licensable results. Drag in an image and it finds visually similar assets across 200M+ licensed images, which is how you legally source something close to a reference photo you can’t use.
For contributors, its tracking tools flag unauthorised uses of their work. If you’re a photographer or a creative agency, this is the difference between finding out about infringement and never knowing.
The New York Public Library Digital Collections
Underrated, and free. The NYPL Digital Collections hold hundreds of thousands of public-domain historical images, including maps, photographs, manuscripts and prints, all with proper metadata and clear rights information.
I go here first when I need a historical image for a project. The rights are unambiguous, the resolution is often excellent, and you’re not competing with everyone else pulling from the same three stock sites.
Openverse, Flickr, Getty Images, Unsplash, Pixabay, and Other Stock Libraries
Quick, honest ranking of what I actually use:
- Openverse: best search across openly licensed images. Filters by licence type properly.
- Flickr: enormous, with real Creative Commons filtering. Great for authentic, non-stock-looking photography.
- Unsplash / Pixabay: free, high quality, and so widely used that your image will appear on 500 other sites. Fine for blog content, bad for brand identity.
- Getty Images: expensive, editorial coverage nothing else matches, aggressive about enforcement. Don’t gamble here.
Always verify the licence at the source, not from a search result. Licences change, and “I found it on a search engine” has never once worked as a legal defence.
Best Practices for Image Search and SEO
These are the image search techniques that affect whether your images get found, which is the other half of this topic.
Use Clear, High-Quality Images
Both directions matter. When searching, a sharp, well-lit source image returns dramatically better matches than a dark or blurry one, because the feature extractor simply has more to work with. When publishing, high-resolution images get indexed more reliably and reused more often.
Name Your Files Right
IMG_5847.jpg tells a search engine nothing. black-leather-running-shoes-women.jpg tells it everything. Use hyphens (not underscores or spaces), keep it under about 50 characters, and describe what’s actually in the frame.
It’s a two-minute change per image and one of the highest-return things you can do.
Add Alt Text
Alt text serves screen readers first and search engines second, and writing it for accessibility happens to produce exactly what search engines want. “Black leather running shoes with white sole” beats “shoes” and destroys “image1.”
Don’t keyword-stuff it. If reading it aloud to someone who can’t see the image would be unhelpful, it’s wrong.
Compress Without Losing Quality
Target roughly 70 to 100 KB for mobile images and 150 to 300 KB for desktop. TinyPNG and Squoosh both do this well. Serve WebP or AVIF where you can, since the file size savings over JPEG are substantial at equivalent quality.
Page speed is a ranking factor, and images are almost always the heaviest thing on the page.
Use Schema Markup for Image SEO
Schema.org ImageObject markup tells search engines what an image is, who owns it, and what licence applies. For product images, recipes and news photos it’s close to mandatory now, since it’s what powers rich results and eligibility for Google Discover.
Google’s Structured Data Markup Helper generates it if you don’t want to hand-write JSON-LD.
Keep Images Consistent
Consistent style, lighting and treatment across a site reads as professional and builds trust. It also helps visual similarity models cluster your assets together, which improves discoverability of your whole catalogue rather than one lucky image.
Make Images Responsive
Use the <picture> element or srcset to serve appropriately sized images to phones, tablets and desktops. Shipping a 3000px hero image to a phone is the most common performance mistake I see, and it costs you on both user experience and rankings.
Put Text Around Your Images
Search engines read the text surrounding an image to understand it. A product photo sitting inside a paragraph about black leather running shoes and cushioning gets classified correctly. The same photo floating in a bare gallery does not.
Use Mobile-First Thinking
Most visual searches start on a phone camera. Your images need to load fast on mobile connections and be legible at small sizes. Design for that first, then scale up.
Be Specific With Keywords
Vague queries return vague results. “Car” gets you nothing useful. “Black SUV 2022 model with sunroof” gets you close. The structure I use is Subject + Context + Style: “men’s leather jacket studio lighting editorial style.”
Use Multiple Tools
Different engines have genuinely different indexes. I’ve had TinEye find an image Google missed entirely, and vice versa, on the same day. If a result matters legally, professionally or financially, check at least two.
Leverage Filters and Advanced Options
Filters are the most ignored feature in every one of these tools. Size, usage rights, colour, file type, date range, domain, page language. Yandex’s Research Mode alone can return 10,000 results with these filters applied. Thirty seconds of filtering beats scrolling through 400 irrelevant results.
Always Check Copyright
Finding an image is not permission to use it. Check the licence at the source, honour attribution requirements, and keep a record. Licensing agreements exist and enforcement is automated now.
Test Across Platforms
Before publishing, search for your own images across two or three engines. It tells you whether your optimisation actually worked, and whether anyone’s already using your images without asking.
Common Mistakes to Avoid
Using Blurry or Low-Quality Photos
Low-quality input produces low-quality matches, because there aren’t enough distinctive features to extract. If you’re working from a screenshot, get the highest-resolution version you can before searching. Upscaling doesn’t help; it invents detail that doesn’t exist.
Trusting One Tool
Every engine indexes a different slice of the web. One search that returns nothing means one index has nothing. It doesn’t mean the image isn’t out there.
Ignoring Filters
I covered this above, but it’s the mistake I see most. People scroll through hundreds of results instead of spending twenty seconds narrowing by size, date or usage rights.
Using Vague Descriptions
Two-word queries are a coin flip. Add context, colour, material, use case. Long-tail queries like “minimalist office desk setup with laptop” outperform “desk” by a wide margin every time.
Not Checking Copyright
Downloading an image because it appeared in search results is how small businesses end up with demand letters. The cost of checking is a minute. The cost of not checking runs to four figures.
Ignoring Image Context
An image can be authentic and still be misleading, like a real photo from 2015 recirculated as breaking news. Always check when and where an image first appeared, not just whether it’s been manipulated. That’s the entire skill in fact-checking.
Real-World Applications and Case Studies
eCommerce: Boosting Sales with Image Search
Visual search solves a problem text search can’t: shoppers frequently know what they want and have no idea what it’s called. They have a photo. Retailers that added “shop the look” and camera search consistently report better engagement and lower cart abandonment, because they’ve removed the naming problem entirely.

Marketing & Branding
Brand managers use reverse image search to track where logos and campaign assets are circulating, catch unauthorised use, and monitor how creative is being repurposed. Set up monitoring once and it runs in the background. Doing it manually doesn’t scale past a handful of assets.
Graphic Design
Designers use visual similarity search for palette matching, texture and pattern discovery, and checking that a concept isn’t accidentally near-identical to something already published. Colour and pattern search, finding images by dominant palette rather than subject, is genuinely useful and almost nobody uses it.
Security & Law Enforcement
Identification, evidence gathering, media analysis, matching a face or object against a database. This is the highest-stakes application and the one with the most serious accuracy and bias caveats. Systems used here should be treated as generating leads, never conclusions.
Case Study: eCommerce Brand Boosts Sales by 38%
A mid-sized fashion e-commerce client came to us with a familiar problem: customers were finding them through outfit photos on social media, landing on a text-only search box, and leaving. Bounce rate on search-driven sessions was in the mid-60s.
We built a visual search feature: upload or tap an outfit photo, get similar products from the catalogue. Roughly $2,000 in development and a few hundred a month in hosting. For full details on our retrieval infrastructure, explore our custom RAG Development Services and AI Data Engineering.
Over three months: bounce rate on those sessions dropped into the low 40s, conversion rate improved noticeably, and average session time went up as people browsed visually instead of guessing at product names. The revenue lift landed near 38%.
The interesting part wasn’t the number. It was why it worked: we hadn’t added a feature, we’d removed friction. Customers never had to learn our product vocabulary.
Real Case Study with Metrics: Solving Product Findability
A different client, a homeware retailer, had 4,000 SKUs and product names written by whoever uploaded them. “Sofa” appeared as sofa, couch, settee and three-seater across the catalogue. Text search was effectively broken.
Rather than re-tagging 4,000 products by hand, we ran the entire catalogue through an image embedding pipeline and rebuilt search on vector similarity, with text search as a fallback. Support tickets asking “do you have anything like this” dropped sharply, and internal merchandising got a side benefit, because duplicate products that had been listed twice under different names finally surfaced.
The lesson I keep relearning: visual search often fixes a data problem, not a search problem.
Future Trends in Image Search
AI-Based Advancements
Multimodal is the direction everything is heading: one query combining image, text and voice. Google’s AI Mode with Gemini integration already handles “find this jacket, but in desert colours with long sleeves” as a single query. Two years ago that was three searches and a lot of scrolling.
Augmented Reality (AR)
Point your camera at the world and get information layered on top of it: product details, translations, reviews, directions. Live camera search already works well; what’s changing is that it’s becoming the primary interface rather than a novelty tucked inside a search app.
Real-Time Recognition
On-device processing is the shift that matters here. Models like Gemini Nano run locally rather than shipping your camera feed to remote servers, which cuts latency, enables offline functionality, and meaningfully improves privacy. For mobile visual search, on-device inference is the single biggest change coming.
Integration with Daily Life
The end state is that image search stops being a destination. It becomes an always-on layer between the physical and digital worlds, with your camera as a query box, everywhere, by default. Whether that’s convenient or unsettling depends largely on where the processing happens and who keeps the data.
Quick Reference Table: When to Use What Tool
| Your goal | Best tool | Why | Cost |
|---|---|---|---|
| Identify an object, plant or landmark | Google Lens | Largest index, best object recognition | Free |
| Find every copy of an exact image | TinEye | Exact-match specialist, sort by oldest | Free / paid tiers |
| Find a person’s other photos | Yandex Images | Strongest public face matching | Free |
| Monitor an image continuously | Lenso AI | Alert system, email notifications | Paid |
| Find similar-but-different products | Pinterest Lens | Built for discovery, shoppable results | Free |
| Source a legally usable similar image | Shutterstock | Returns licensable results only | Paid |
| Historical or public-domain imagery | NYPL Digital Collections | Clear rights, strong metadata | Free |
| Build it into your own product | Cloud Vision / Rekognition / Clarifai | API access, custom models | Usage-based |
Conclusion
If I could only keep two tools, I’d keep Google Lens and TinEye. Lens for “what is this,” TinEye for “where did this come from.” Together they cover perhaps 80% of what most people need, and both are free.
If you’re publishing images, do these four things this week: rename your files descriptively, write real alt text, compress to sensible sizes, and add ImageObject schema to your product and article images. That’s an afternoon of work and it outperforms most of the clever tactics.
And if you’re building visual search into a product rather than just using one, start with embeddings and cosine similarity, use a pre-trained model before you consider training your own, and expect the hard part to be your data, not your model. It always is.
Pick one image you care about. Run it through Google Lens and TinEye right now. Whatever you find will tell you more about your situation than another 2,000 words from me.
Frequently Asked Questions (FAQs)
How does Google Lens work?
Lens converts your image into a numerical embedding, matches it against pre-computed embeddings across Google’s index, then re-ranks results using page authority, metadata and your context. Object localisation lets it isolate a single item in a busy photo. Practically: point your camera or upload an image, optionally add text to refine (“in blue,” “under $80”), and it returns identifications, similar images and shopping links.
What is reverse image search?
You search with an image instead of words. Upload a photo or paste an image URL, and the engine returns where that image appears online, along with visually similar ones. It’s how you find an original creator, check whether a photo has been edited, spot stolen content, or verify that a profile picture isn’t lifted from someone else’s account.
How do image algorithms like CBIR and CNN work?
CBIR analyses actual visual content, meaning colour histograms, texture, shape and spatial layout, rather than surrounding text. CNNs are the deep-learning engine that usually powers modern CBIR: they process an image through layers that detect progressively more complex features, from edges to full objects, producing an embedding that represents meaning rather than pixels. That embedding is what gets compared.
Which tool is best for finding stolen or duplicated images?
TinEye, then Google Lens as a second pass. TinEye specialises in exact matches, including crops and edits, and its sort-by-oldest option identifies the earliest known appearance. For ongoing monitoring rather than one-off checks, Lenso AI’s alerts or Google Alerts will notify you when new copies surface. Document what you find before sending a DMCA takedown notice.
What are the different types of image search techniques?
Six main ones: keyword-based search (text describing an image), reverse image search (find copies of a specific image), visual similarity search (find aesthetically similar images), pattern and colour-based search (find by palette or texture), facial and object recognition search, and multimodal search (image plus text in one query). Most real tasks combine two or three.
What is the best tool for image search in 2026?
Google Lens for general use, since the index and object recognition are unmatched. But “best” depends entirely on the job: TinEye for exact matches, Yandex for faces, Pinterest for creative discovery, Shutterstock for licensable results. Anyone who tells you one tool wins every category hasn’t tested them side by side.
How can I verify if an image is real or fake?
Reverse search it across at least two engines and sort by date to find the earliest appearance. Check whether the image predates the event it’s supposedly showing, because recycled photos are far more common than sophisticated fakes. Look at metadata where it survives, check whether reputable outlets are using the same image, and read the original context rather than the caption you were shown.
How does visual similarity search differ from reverse image search?
Reverse image search looks for the same image: direct copies, crops, resizes, recolours. Visual similarity search looks for different images that share characteristics: composition, colour palette, subject matter, style. If you want the source of a photo, that’s reverse search. If you want “more like this,” that’s similarity search.
Do I need to pay to use image search tools?
No, for almost everything. Google Lens, TinEye’s standard search, Yandex and Pinterest Lens are all free. You pay when you need continuous monitoring, high-volume API access, licensable stock results, or enterprise-grade face matching. Most people never hit that line.
How is AI changing image search in 2026?
Three things: multimodal queries that combine image, text and voice into one search; on-device processing that keeps your camera data local and works offline; and much better contextual understanding, where models now interpret scenes and relationships rather than just labelling objects. The net effect is that searches feel conversational instead of mechanical.
When should I use keyword-based image search?
When you need a type of image rather than a specific one: stock photography, concept visuals, illustrations, blog imagery. It’s faster than uploading a reference and lets you specify things no image can convey, like usage rights or file type. Use long-tail phrases; two-word queries waste your time.
Is AI image search accurate in 2026?
For common objects, products, plants and landmarks, it’s very accurate. For specialised, technical or obscure subjects, it’s inconsistent, because the models are limited by training data. Face matching accuracy varies significantly across demographics, which is a real and documented problem. Treat results as strong leads that deserve verification, not as facts.
What is the best image search tool for businesses in the United States?
For general use and commerce, Google Lens and Google Cloud Vision API. For brand and copyright monitoring, Shutterstock’s tracking tools or Lenso AI alerts. For building visual search into a product at scale, Amazon Rekognition or Google Cloud Vision are the standard picks, with Clarifai a strong option if you need custom models without deep ML expertise in-house.
How do I do a reverse image search on my phone?
On Android, open Google Lens or long-press any image in Chrome and choose the Lens option. On iPhone, use the Google app’s camera icon, or long-press an image in Safari and select the search option. Both let you crop to a specific part of the image first. Do that, because searching a cropped region almost always returns better results than searching a whole cluttered photo.
What is multimodal image search?
Combining more than one input type in a single query, typically an image plus a text refinement. Upload a jacket and add “in desert colours with long sleeves,” and the system searches for both simultaneously rather than sequentially. It’s the biggest usability improvement in image search in years, because it lets you describe the difference between what you have and what you want.
References
Umar Abbas
Umar Abbas is the Principal AI Architect and Operator of SoftBrixAI. With years of experience in distributed systems, security-first architectures, and high-performance computing, Umar leads the engineering team in designing production-ready, security-hardened AI solutions.